Showing posts with label Mid-Century Modern. Show all posts

Thursday, November 3, 2011

A Few Found Objects

Had these photos I took sometime during December of last year and thought I would post them with a few comments. All of these items were basically free.

The first is an Eames knock-off that I found on the curb near my house. Not in bad condition - the shell doesn't have any tears or bad scrapes. The legs are a little rusty but I think this chair has spent the last few years outside. We've had it a while - it lives near the sliding-glass door that enters the house from the carport.


Slightly to the left of the chair is the doorway and the original doorbell. I'm not sure if I ever took a photo of it so thought I would post. When we moved into the house the doorbell was painted a matching Kelly green with the trim. It took a bit of scraping to get the original pot metal to show through - I also found an inexpensive doorbell switch to replace what was in there so the button is a new replacement.


I think it's fairly unusual but definitely vintage and probably the original doorbell for the house.

Finally, while rooting around in the basement I found the Howard Miller clock - the balls and stems have been hand-painted the hideous blue and the cord needs replacement. The hands are also a little beat-up but I think this clock is entirely restore-able (another project - yeah I know). I'm not sure what the original color of the balls were - welcome to some recommendations?


It's currently living to the right of the fireplace but will probably get moved. Anyway, that's all for now.

-- John

Thursday, January 28, 2010

Restoring Metal Carport Posts

I recently was tasked with replacing two metal carport posts and thought I'd share the experience. While at first this might seem a bit daunting, I think you'll find as you read that it's not as bad as it sounds. Most of the homes in our Northcrest neighborhood have metal posts supporting the 4" x 8" douglas fir support beams that are exposed in the carport and the front patio (if the home has one). This was a very common building practice by P&H Home Builders and is the norm for all the tri-level modern homes in this neighborhood, and those homes built by P&H in Northwoods and other local communities. Howard Hardrath's brother, Buddy, continued with this practice in his version of the P&H Split in Lilburn, Stone Mountain and other areas. It was also used by very many other modern builders in the area, although the pipe diameter may vary a bit.

Let's talk a bit about the construction. These posts are mostly made of 2 1/2" diameter steel pipe welded to a 1/4" thick metal plate with dimensions of about 3" x 6", offset (meaning the pipe is welded to one end of a rectangle). I've found the plate to vary a bit in length, with a minimum of about 5" and getting up to about 5 1/2" at a maximum - the plate always has four holes drilled at the corners where nails were pounded into the beam above for stability. The pipe used provided almost 1/2" of additional diameter provided a total diameter of around 3" (metal pipe is measured by the inside diameter so in order to get 3" on the outside, you buy 2 1/2" pipe, which has a wall thickness of slightly less than 1/4" providing the total diameter). What I find interesting is that almost all of the original posts in the neighborhood only have a plate and are attached at the top - the bottom is the open pipe, usually sitting flat on the concrete pad or brick wall below. I'm not sure if you can get away with this method in modern construction - seems non-code to me. I think this method was used for a practical reason, rather than as a cost-savings one - as the home expands and contracts with weather, there's some movement in the wood - by "floating" the bottom post it's possible to allow for this movement - however this is conjecture on my part. Some of the posts I've seen also have a bottom plate, but strangely they aren't attached either (no nails, lags, etc) so that's not really a clue.


In any case, as with any metal and especially metal that touches concrete, over time and with repeated exposure to weather produced rain water, the bottoms frequently "rot out" - usually it's the posts closest to one end of the building's side or front. With this home it was the two to the outside of the carport, which would have the most access to rain. Normally a little pitting or rust can just be treated - but these posts each had quite a bit of rotting - one was actually hanging from the beam above and both could easily be moved around by kicking around the bottom. (as an aside, if you want to just treat the posts a bit of sanding or grinding of any rust, body filler if there's only some slight pitting, and a bit of good metal primer and paint will go a long way to preserving what's there).

My first task was to determine the width - I initially did this with a good tri-square ruler to determine the general diameter - I later confirmed using an outside-caliper - these posts were just slightly under 3." The next task was to source the goods - there are many good steel fabricators around the area - I got a list of three that were north of here from a friend who used to build homes in Forsyth and Cherokee County. I decided to go with a local shop near Tucker, Dekalb Steel.


You'll need to determine the actual length of the post (make sure you include the plate thickness) by measuring the actual distance from the beam to the floor (concrete or brick) - this can be off by a bit if you think the beam has sagged with the deterioration of the post - just make sure you go over-sized and not under-sized! It's also good to provide a small sketch of the construction for the plate - I did this by going into SketchUp and producing a nice 3-D rendering, and then making a jpg image to fax to Dekalb Steel. By doing this and showing the location of the drill holes, you'll get something closer to what you're asking for - welders produce good results when giving good images and instructions.


It can take anywhere for a couple of days to about a week to turn around the fabrication. If you have access to a good metal shop you could do the task yourself - just make sure you can get a good 90 degree cut on the ends so they're "square" - this typically takes a metal bandsaw. Drill the end plate before welding so you can use a drill-press. Unless you specify otherwise, the post will come "raw" - complete with surface rust and any marks used by the handlers - you can have them paint it but it'll cost more and they usually just spray some paint on it, meaning that there's not much effort involved in doing the prep before painting so you may get mixed results (sometimes the rust and/or clay or wax scrawl on the metal bleeds through - other times the paint may flake off as there may be some oily or waxy residue on the metal). I chose to get the post bare and do the prep myself. The prep involved a light sanding followed by two coats of metal primer. It was about 16 degrees outside when I started the install so I spent a day doing the sanding and priming the posts on saw-horses, to give the primer a chance to set up. This was done in the sun so that helped harden up the paint. Usually it's too cold to do this type of work but I've found primer to be an exception to the "too cold" rule - later I'll relate how I got the black paint to dry in this type of cold.

The next step is to remove the old posts and replace with the primered new. To do so there are various methods, but as I had an extra screw-type jack-post I decided to use it. I nailed a short tubafor to the bean near the first post - with a bit of the nail-heads left proud of the surface for easy later removal. Next the post was adjusted so there was plenty of threading left to lift the head of the post (the head is a plate that can be screwed to the tubafor to help keep it from slipping off) - there's a flat threaded collar that can wrenched on, which drives the threaded part of the post up or down, lifting whatever weight is above it. I wrenched up until the old post easily cleared the concrete below - about a half inch. I then measured, cut and placed a forbafor post next to the jack - this was a little added insurance as I don't completely trust the post - probably not necessary but I wanted a bit extra for piece of mind.


Prying the old post off was relatively easy, as was attaching the new post. You'll want to use along level to make sure the post is plumb, holding it in place as you turn the jack screw the opposite direction to bring the beam/roof down. Before taking everything apart, check for plumb again and make any adjustments if you need to. I then repeated for the second post (this one involved the removal and later reattachment of a gutter).


The final steps were to float some concrete along the bottom (there was a depression in the existing concrete where the old posts had "drilled" into the substrate below) and paint the post. I waited until it was a bit warmer to do both of these, as concrete does not set up well in freezing temperatures. I used an oil-based enamel Rustoleum product in gloss black - being the closest color to the existing posts. Because of the cold I added a cap-full of Japan dryer to the paint in a paper cup. Japan dryer is a mix of chemicals (mostly naptha) that accelerates the evaporation of the paint's solvents - in this case the paint was dry to the touch in about an hour and completely hard in a day or two. The hazard of painting oil paints in cold weather is that they just wont harden - there isn't enough temperature for the solvents to evaporate so they remain tacky. Using the dryer is an old painter's trick - just make sure you mix enough to do the whole project and throw out any remaining in the mixing cup instead of pouring it back into the can. A little clean up and I was done.

-- John

Wednesday, December 16, 2009

Building a Shell Chair


I was sent this from a friend. This video shows the process of mold creation through production and assembly of a variety of Herman Miller produced and George Nelson designed shell chairs. Notice all the manual handling (especially the ungloved hands around the fiberglass materials!)..They certainly don't make them like this anymore!


-- John

Sunday, December 6, 2009

Restoring an Original Kitchen Sink Base Cabinet

In this first of a series of Restovation posts I'll describe a small project to preserve an original kitchen sink base cabinet. In this instance the original supply lines have been replaced by Pex pipe and a hole cut into the floor for access. Also, multiple leaks from the sink and garbage disposal have completely destroyed the cabinet "floor" to the point of bowing the floor in the middle and delaminating the plywood layers all about. Besides being unsightly, it's unsanitary, allows bugs to congregate and provides moisture for all manner of undesirable substances. The easy solution is to replace the unit - the issue is that the cabinets made back in the 50's/60's (when this particular home was built) were commonly built in-place, often at the whim of the particular carpenter who built or installed the cabinet (if by chance it was made off-site). It's not like today where you can buy each cabinet as a separate component and level them up on site - modern cabinets have interchangeable parts, something your very rarely see in cabinets from this earlier era (with the exception of some of the custom European cabinet makers).


To make the task more complicated, cabinets from this era also rely heavily on mortise-and-tenon joinery for the face frames (as does this particular example). This makes it difficult to replace the "floor" of a cabinet with a single sheet of plywood, as there may be a separator in the middle of the face-frame (the doors rest upon this separator and there is often a latch involved in these old cabinets).

I'll describe briefly the term for those not familiar with that mode of construction - the mortise-and-tenon allows sticks of wood to be joined at right angles to one another - this is accomplished by cutting a groove or slot in the flat side of one board (the slot is called the mortise and the stick in this case is the rail or cross-piece) and having an extension in the perpendicular board by extending a "tongue" at the end of the other stick (the tongue is called a tenon and the stick in this case is called a rail). This joint is very strong and still used today, however in production shops it's nearly been replaced by the use of pocket screws (screws that are inserted from the back so they are hidden, angled down into the cross piece from the end of the "stick". This comes into play as the face of the cabinet (basically the surface that all the doors rest on) is made up of a frame or multiple frames of wood - thus the "face-frame"...


So the task is to first remove the mortise-and-tenoned face-frame separator, cut out the existing rotted floor and replace with a single piece of plywood. In this example I noted that much of the problem was caused or at least exacerbated by the discharge pipe leading from the bottom of the garbage disposal through the floor into a trap in the basement. Modern dual sinks share a common trap, so I thought I would reconfigure the drains and remove (and cap) the extra below-floor trap. This did require a bit of head scratching to get the pipes all aligned and working correctly - as an additional benefit, there's now more room under the sink.

In this next shot you'll see the separator removed - to do so I developed a technique of jacking up the front of the cabinets to extend one tenon from the mortise - in this next photo you can see that the floor ahs been removed and the tenon removed - note that the other end has been carefully cut apart from the stile above. In some instances both ends of the rail's tenons can be successfully removed - however in this case only one end would come apart (don't worry I have a plan for reattaching it).
Also note that I've begun reworking the plumbing and that I've added some two-by-four supports for the floor to help prevent any future sagging.


The next step is to carefully measure and install the new floor. The trick is to get as custom a fit as is possible - so the same dimensional thickness of plywood is used and very little gap is allowed between the old and new floor. The floor back is drilled with holes just slightly larger than the Pex pipe to allow access for the supply lines. The floor is then installed using brad nails to minimize exposure of the fasteners.


After attaching the new floor comes the final step, which is preparing the removed rail for reinstallation in the cabinet face frame. I earlier mentioned the use of a pocket hole - well here is a photo of a Kreg pocket hole jig clamped and ready for drilling. The Kreg kit uses a flat-faced vice-grip style clamp to ensure that the two parts of the face frame are exactly on the same plane. The jig provides a guide for the special Kreg bit to drill the exact angle and depth needed for the thickness of the face frame. Once the screws are tightened it creates a very strong joint and since they're on the back of the rail the replacement is invisible.


For this particular example the last thing to do after face-frame reassembly is to complete the changes tot he drain plumbing. You can see in this final image how much neater everything looks - also there's a bit more room under the drains for cleaning products, sponges and whatnot.

Sheet 1/4" Luan plywood: $8
Scrap 2x4" material - Free
Misc PVC Drain bits: $16
Saving the original cabinets - priceless.

-- John

Wednesday, October 14, 2009

Restovation

I've been using a term lately that I picked up on one or more of the fora I frequent but I thought I would talk about it a bit - restovation. It's being used as a catch-all when a homeowner is doing some remodeling and he wants to be sensitive to the original architecture - a composit of Restoration and Renovation. Sort of the opposite of a remuddle (another meme indicating that a remodel done poorly, especially one that isn't sensitive to the building's intent or architecture) - I'll discuss both in regards to mid-century modern homes:

Restovation
My take on a restovation is to make architectural changes that are close to the same or at least sensitive to the original builder's intent - basically to make alterations that either can't be detected, or to remove a poorly applied remodel by replacing or "fixing" with something that could have been part of the original builder's construction. When at all possible I try to keep original features and refurbish when necessary (at minimum a good cleaning does wonders - sometimes I'll try to fix fixtures and such or replace with something that's close). Of course there's varying degrees of restovation - some things that are missing simply can't be replaced and compromises have to be made, especially when fixing a bad remuddle. The trick here is to find replacements that aren't complicated - usually the simpler the better. The other trick to being successful is to use patience - that missing something or other could be waiting on the curb in your neighbor's trash a year from now.

Remuddle
In general a remuddle is any remodel that isn't sensitive to the architecture - like replacing the front door with some obnoxious Home Depot purchased beveled glass monstrosity or putting a bay window on the front of a modern house. Neither of these would have been part of the original mid-century modern design and only "muddles" the clean lines or hides that the house is modern. You'll see variations of this - the addition of shutters, ornate exterior sconce lighting, an added Bay window, the list goes on.

A good restovation would incorporate good, clean design changes, keeping elements that are both appropriate and still useful for the time we currently live in. I'm not at all opposed to updates, especially to the kitchens and bathrooms of mid-century modern homes - often the tile is cracked or otherwise rundown and defective, or the original cabinetry is failing and it's simpler to replace rather than repair - plus you can't beat the new cabinet hardware and storage doo-dads that are available now. The trick is to remain sensitive to the original house design and intent (French Provincial cabinets simply look ridiculous in these houses). When possible I like to keep the original kitchen provided it's in good shape and restorable - I'll discuss this more in future posts by showing effective methods of doing so.

A bad remuddle would have one or more of the following :
(I lifted this from the Lotta Living forum post "100 Ways to Screw Up Your Mid-Century Modern Home" with a couple of edits)

1) Adding a steeper roof on top of your flat or shallow pitched roof.
2) Ornate front door. (Etched glass windows)
3) Adding a second story.
4) Putting in a country kitchen.
5) Installing a white metal colonial style garage door in place of the original redwood sided door
6) Adding vinyl double hung replacement windows
7) Heading to Home Depot/Lowe's with home equity loan money in hand
8) Adding inappropriate window treatments i.e.-paned windows, decorative shutters, fancy storybook scrollwork/moldings.
9) Replacing your tar & gravel roof with Spanish tile.
10) Covering your tongue & groove ceiling and wood beams with sheetrock
11) Roof over the atrium and add desirable square footage
12) Putting a white picket OR Wrought Iron fence in the front yard (or ANYWHERE for that matter)
13) One word: Stucco
14) Two words: crown molding!
15) Three words: 70s wall paneling (unless your home was built in the 70's and it was already there)
16) Carriage lights
17) Slathering one color of paint over everything - double points if it's Peach, Pink or Yellow.
18 ) Painting over stone or brick
19) Replacing single pane glass in the glass end gables with plywood
20) Vinyl siding
21) Installing gaudy brass light fixtures.
22) Covering up glass or painting over it.
23) Replacing in slab ductwork with overhead ductwork (exception for low-homes in the flood plains!)
24) Enclosing the carport / Converting the garage into living space
25) Granite!!!!!!!!
26) Install over-sized "professional grade" appliances (Viking, Subzero) in small galley kitchen.
27) Covering poured terrazzo with Home-Depot ceramic tile
28) ANYTHING made out of bright, shiny brass
29) Tear it down to build a McMansion
30) Tearing out the original flat panel, flush faced kitchen cabinets and replacing them with fancy, ornate routed ones
31) Replacing original wood framed windows with aluminum framed sliding glass doors
32) Basin sinks / oversize tubs / Anything described as turning your bathroom into a "personal spa" or "retreat"
33) Installing inappropriately decorative house numbers.
34) Selling off all the one of a kind, original architect designed furniture and light fixtures because it "doesn't fit in"
35) Putting in grid windows
36) Installing a ceiling fan in a vaulted, exposed beam/t&g ceiling
37) Using a pick axe or jackhammer to remove original 8x8 linoleum tiles so one can install Home Depot terracotta pavers
38) Installing hardwood floors over a radiant heated concrete slab
39) Dutting down the fascia, removing original down spouts to install gutters.
40) 2hitewash the interior with white paint to make it feel larger
41) Marble!!!
42) STUPID DOOR HANDLES (ornate lever style)
43) Visual overload (too many elements)
44) Big Greek / Italian /Mediterranean columns added to the front (or inside). Also, gaudy statues and fountains containing cherubs, angels, naked people, The Virgin Mary etc,
45) Painting over unpainted exterior wood (instead of stain)
46) Collecting and displaying too many knick knacks in a 1200 sq ft MCM house:
47) Removing all signs of nature outside by putting concrete everywhere, thereby defeating the harmony between house and nature attitude of many modernists.
48) Sticking a mantle on a stone fireplace that isn't supposed to have one.
49) Putting a white lattice archway in the front yard walkway with flowers and vines growing all over it.
50) Plain ole' neglect...having a cool MCM home, and letting it go...chipping paint, rotted fascias, overgrown foliage etc...
51) Paint a redwood or pine tongue and groove ceiling
52) Covering beautiful terrazzo floors with nylon fiber wall to wall carpet to "update the place"
53) Installing an aluminum, free-standing patio
54) Popcorn ceilings
55) Installing the cable box right outside the front door
56) Putting in one of those one-piece molded plastic mailboxes on a post.
57) Fake brick exterior siding (There's a bunch of these on the Neutra tract homes near the Burbank Airport).
58) Compromising your principles.
59) Misunderstanding/confusing "Ranch House" with "Ranch Style" house thus recreating the Little House on the Prairie
60) A sweet barn style shed.
61) Lace curtains
62) Placing ANYTHING in or around the house from Hobby Lobby, Kirkland's, or credited to either Thomas Kinkade or Mary Englebreit.
63) Smothering the interior with cheesy wallpaper.
64) Removing perfect mahogany paneling so that it can be replaced with drywall (this also includes just covering it with drywall).
65) Saltillo Tiles
66) Adding onto the back, after all, all that glass makes a great room divider!
67) Never throwing anything away.
68) Adding exposed conduit, wire mold, or worse, exposed wiring to beams and columns of you post and beam home.
69) Buying a mid-century modern home and then normalizing it to make it look like any other home.
70) Round top windows! (double points on this one)
71) Raising up your slab on grade MCM home and adding a basement under it.
72) Replacing your vintage globe lights with too much cheesy low-voltage lighting.
73) Adding a shingle roof in place of a tar and gravel roof on a pitch that is too low for shingles. IT WILL LEAK!
74) Three or four masonry materials where one or two will do.
75) Invite 100 scooterist over to your house, with a live punk band, and 5 kegs of PBR (no, I haven't done this... yet)
76) Adding an addition not in the style and design of the home
77) Allowing termites to gobble it all up
78) Anything faux
79) Hire an architect who doesn't understand Modernism
81) Stained glass or beveled glass windows
82) Tiling over original magnasite deck... extra points for bad colorful folk art tile
83) Placing a Pink Flamingo in your Garden/Yard
84) Describing MCM houses as "retro"
85) Placing an A/C unit on the top of your roof
86) Refacing an original fireplace, let alone with a thin flagstone laminate
87) Installing arches or rounded corners in a room opening or between rooms
88) Turning the master bedroom into a den
89) Replace your garage door with a brick fireplace
90) Inappropriate furnishings?? (aka flowery couch with detailed, routed wood)
91) Adding brick driveway columns topped by gold stone lions
92) Building a circular turret on the front of the house
93) Adding lattice to the front to "improve the look and privacy"
94) Covering the metal columns with wood to make them look like more like classical columns.
95) Hanging seasonal flags (i.e. santa, the easter bunny) outside your entryway
96) French doors to patio
97) Sawing off the overhanging roof and beams
98) Covering up exposed beams so the house look like other conventional framed homes
99) Adding turned pickets to all railing for that "country French" look!
100) Looking over an untouched, near-pristine P&K home and then declaring , "It has such potential!"
101. Painting over original polished aluminum Nutone range hood and splash shield.
102. Removing original skylark boomerang formica countertops
103. Tearing out original award winning landscaping to plant box woods.
104. Planting boxwoods
105. Planting bradford pears
106. Yard ornamentation
107. Turning your front yard into a playground with playset and/or trampolene
108. Inappropriate landscape lighting
109. Hanging towels up in place of curtains
110. Non thoughtful placement of new thermostat
111. Inappropriate storm doors
112. Bad porch lights
113. Horrible door knockers
114. Fake stained glass inserts
115. Painting your concrete porch green
116. Satellite dishes
117. Less than thoughtful placement of the ac unit
118. White plastic lattice screens!
119. Shutters!...
120. Screwing down additional insulation onto your t&g wood roof deck with screws that are too long and pierce through to the inside.
121. Painting over birch (or any other wood) closets/paneling.
122. Let the realtor do it, so you don't have to
123. Installing a classical European wallpaper mural
124. Letting a real estate agent list a house as "desirable lot" and not even showing pictures of the MCM house.
125. Hiring a realtor who just doesn't get it

Here's a good article about 4 renovation trends that
should go away.

-- John

Wednesday, July 23, 2008

The Modern Doll House


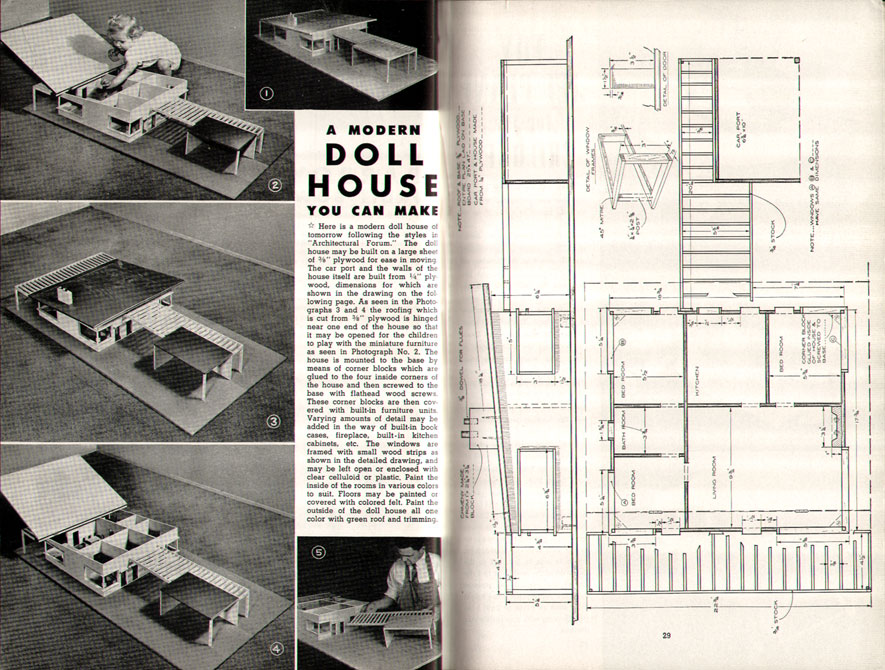
As some of my acquantences and friends know, one of my other passions is woodworking and restoring Old Woodworking Machinery. So I hope it explains why I have possession of a set of 4 volumes of The Deltagram - books that detail shop projects for the owners of Delta Power Tools. This publication began in 1932 and continued to be published until 1949 - earlier issues seem to have been more prolific but they averaged about 6 issues per year. In 1949 the publication became "Wood Chips" or may have merged into another Delta publication (I'm unclear as to the series of events), which continued to be published into the 70's.

Besides being of interest as an idea storehouse for woodworking, this publication as is true of so many others, also details the styles and likes of homeowners and the US pre-war through post-war. Of particular interest are the modern furniture and furnishing designs featured all through these magazines and aggregated in these 4 volumes. The earlier issues have some wonderful ideas for Deco and Machine Age items, while the later feature "modern" design. Today I'm featuring the latter - and in this instance it also features one of my other passions - vintage toys.

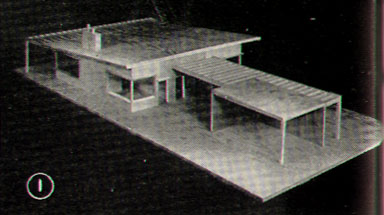
There have been a number of threads over the past several years that regarded Modern Dollhouses offered to young girls during the post-war period. What interested me in this 2-page spread, found in Volume 4 of The Deltagram (originally published in Vol. 16 No. 2 in 1946) and revealed as page 28 and 29 in the hardcover editions, was the floor-plan, the shed roof, corner window and port-a-chere. I don't believe I've ever seen all three elements in a doll-house before. Even the plastic modern doll-houses seem to be based more on the modular Eames house design that this one. Apparently this doll house followed the styles of "Architectural Forum" and used plywood for construction - also a modern building material.


For a higher-resolution image of the above scan
click here.

-- John

Wednesday, October 3, 2007

2007 DOCOMOMO Home Tour - Part 3

The final house on the tour will be of most interest to this group. This house is owned by Jeff Dowd and his wife and is also in the Amberwood sub-division. It's located on the crest of a ridge so the yard slopes both to the front and back, as well as to one side.


The owner knows very little about the original designer of the house and has spent the last few years since his purchase in doing remodels, adding an addition behind the left side (one bedroom was made into an office, the garage on that side closed off for storage, parking moved to the rear part of the addition and additional family room space added to that side). The house has a full basement that is used as an apartment by Jeff's mother (it has a private entrance and driveway on the right side of the yard, below the decking). The master bedroom and master bath have both been reworked by Dowd as well as the rather involved landscaping.

When purchased, the rear wall had been pushed out to incorporate the patio (original fire-pit style grill is still attached and uses the existing chimney for ventilation, though it's unused). An arbor-style extension (extending the existing beams past the rear wall glass-wall) was added to the back to provide some much needed shade to the rear of the house. The front door has been replaced by a really beautiful, hand-carved mahogany double door from Brazil. The over-all effect is a large living expanse open to both front and back with some amazing birch trees obscuring the street from the living room.

Jeff decided to keep and have restored the original wall-mounted oven with slide-out stove. To the right of the sink is an original counter-top Nutone blender unit. The bathroom remodel is stunning, with a large tiled tub and exterior sliding glass to the exterior and over-head skylight. The real beauty of the house is in it's modernistic, very Asian design elements - the owner had viewed the botanical gardens in Portland used these as influences in the deck railing design (top rail is roof-beveled to shed water).

Photo Album here:
http://www.flickr.com/photos/14338634@N02/sets/72157602234061713/

-- John

Monday, October 1, 2007

DOCOMOMO GA Home Tour 2007 Part 2

This is the second part of three describing the DOCOMOMO Home Tour held on 2007.09.29 in Atlanta, GA. The second house on the tour was also designed by Robert Green and construction was finished in 1964, I believe. The story is that RG had designed the home for a client who then decided not to build. Around the same time, RG was designing homes for the Amberwood development - this was a unique neighborhood with a business model of selling unbuilt lots - the buyer would then either purchase plans and construction from the developer or bring in his/her own architect and building crew. In this case, RG built one custom house (the Nicoll house - more here: http://www.modusmodern.com/robertgreen/nicoll.asp) and had been hired to build the entryway to the neighborhood - the developer saw the original plans Robert had created and hired him to adapt them to the lot it's currently on - the developer's name was Robert Witcher (more images and the plan here: http://www.modusmodern.com/robertgreen/arrowhead.asp).


The Witchers lived in the home with their two small children for 7 years before selling to the current owners (actually the surviving second wife of the second owner). The House featured an 8x8 tiled bath that could be filled with water that the children referred to as their "kiddie pool." Unfortunately I didn't take any images of the room, as it's quite spectacular with a full skylight above the space and light green jade tile, commode and sinks. The house is quite unusual with a main structure making up the "point" of the arrow, a long hall with small alcoves opposing bedrooms, and a "tail" family room that was formerly a carport - RG was hired to transform the carport into the current family room and an external 2 car garage was added - at some point the garage was extended upward and a guest house was built, much to RG's dismay. Two additional structures were also added, a pool house and a workshop - neither of these three structures have more than a passing resemblence to the original structure (the garage has obvious lines in the bottom floor and some details were carried over, but the general lines were all abandoned).

The long hallway reveals many surprises, FLW style, with new rooms, alcoves, shelving and geometric shapes around every corner. The main living room comes to a slightly acute point, with a two sided fireplace in the opposite corner. The front eave of the house actually comes down to chest level making this a remarkable construction indeed.

Photo Album here:
http://www.flickr.com/photos/14338634@N02/sets/72157602225231786/

Part 3, the Dowd residence, will go up shortly.


-- John

Sunday, September 30, 2007

DOCOMOMO GA Home Tour 2007 Part 1


I thought I would provide some running commentary plus some photos from the DOCOMOMO Home Tour yesterday (2007.09.29).

Cindi and I left the house at 9:00 AM but had to run some errands (placing directional signs and ballons around the Amberwood subdivision for the tour) before arriving at the first house. Because we shared responsibilities as docents at the Dowd House (in Amberwood) and were expected to arrive by 1:45 to relieve the first docents, we were limited in time and decided to only view the 3 houses on the tour, regrettably bypassing the condo at Plaza Towers. There were four homes in total on the tour and they were separated by some distance so one would need to factor in some travel time. This year two homes were designed by Wright Fellow Robert Green - the first is the Copeland house near buckhead off of Northside Drive. This first photoset features the images I took in the morning before heading back towards Amberwood (the two remaining homes were both in Amberwood).

As to the Copeland House, there's not much I can say that hasn't already been said. The current homeowners were present and had photos of the original construction and comparison shots of two historical remodels, passed to them from previous owners. The house is simply amazing. The level of detail and use of materials was quite stunning, even the furnishings (I wish I would have taken some images of the Nakashima table) had the effect of flooring me as I crossed rooms. I was running low on disk space so I spent most of my time taking shots of architectural details. I also tried to get shots that didn't contain people, so some of the details are sparce. I hope to aggregate photos taken from others to make a more complete journal of the visit - an hour went by very quickly.

I'll try to get photos of Arrow Head up later tonight or tomorrow.

-- John

Sunday, August 19, 2007

Greetings from the UK!

I received this email from Sharon in the UK

Hello , You may or may not find this interesting, but we have purchased a modernist bungalow in Horsham Sussex uk. 1968 that needs complete restoration. We are currently opening out all the rooms to give a light and open plan airy feel to the house and it's back garden. We love late 50's/ 60's furniture. Perhaps you know of some good web sites that might be able to help us?
Ignore the chesterfield in the pic, isn't so Victorian ha ha. !! Would you like to see a pic or two on our back garden. No grass to cut ! oh bliss.

Regards
Sharon

This is the first Modusmodern "fan" email - thanks for the images Sharon - love the herringbone floor! Keep the images coming!

-- John

Saturday, August 18, 2007

DOCOMOMO Atlanta, GA: Consider the Ranch: August 14th and 21st


I missed this DOCOMOMO seminar on the 14th but plan to attend on the 21st. The host is the DWR store in Buckhead. These seminars are usually very good and informative, plus you get to meet other modernists from around the Atlanta area.

What: Consider the Ranch, a look at the development of the Ranch House
Who: Richard Cloues, Georgia Department of Natural Resources, Historic Preservation Division
When: 6 PM, Tuesday August 14th (part 1); Tuesday August 21st (part 2)
PLEASE RSVP: info@docomomoga.org
Where: Design Within Reach, Atlanta Studio, 295 E Paces Ferry Rd, NE, Atlanta, Georgia (404-841-2471). For directions, click here.

-- John

Sunday, July 29, 2007

Thinking About a New Roof?

I put together the following and posted the information on the Lotta Living Forums - the thread was about the differences in roofing methods used both in the past and in the present, on Mid Century modern homes. I believe that readers on ModusModern could also benefit from my past roofing experiences, so with a small amount of editing, here you go...

A New Roof

After being sold on a membrane roof on my house in Atlanta (this is often referred to as a "torch-down modified" roof - it's applied in layers using a MAP gas torch), only to have it fail within 6 months, I can give you quite a bit of qualified advice.

First, if you have a flat roof, it was probably installed as a "built-up" roof, using an underlayment of felt, some type of insulative barrier (my roof had 1 inch styro board - these days they use perlite and possibly ISO board, which is actually for insulation with perlite). These boards were typically nailed - note that if your ceiling is also the roof (in my case the roof boards are the same as the 2x6 tongue-and-groove ceiling) and any wiring for lights is typically nailed to the roof under the boards (be careful and mark where the wires are) with special fasteners - then a layer of hot asphalt is applied with a mop (called hot-mopping). Over this is laid sheets of 15 or 30 pound fiberglass/asphalt felt. This is repeated, possibly twice (for 2 to 3 layers), before a cap of asphalt is hot-mopped. Onto this is spread pea gravel as ballast. The gravel also plays an important part in continuing the life of your roof - the rock reflects light away from any exposed fiberglass underneath - it's actually the UV rays of the sun that causes the most damage to this type of roof, and not the weather per se.

There are usually four avenues for a replacement/repair for this type of roof, depending on the condition (in order of cost - least to most):

1. Rolled touch up using some type of liquid barrier/sealer - the cheapest method, the gravel is brushed to the side and the sealant is applied with a roller - then the old gravel plus any extra for coverage is spread back over the roof. This is usually only good for very temporary repairs - say you need a year to get your money together for a real repair. I would actually not recommend this method but it could get you dry for a little while.

2. Torch-down Modified - with this method, a roll of thick roofing material is melted onto the existing roof using a MAP torch - can be risky as the whole roof can literally catch on fire (asphalt burns!). To meet manufacteror's specifications, the roofer should actually fasten a layer of perlite to the existing roof after brushing off the gravel (using approved fasteners), the roof edges should be built up with a nailer board, the material applied (hopefully melted onto the substrate) and new flashing installed. Typically the old flashing is left in place but cut-off where it extends to the eaves. This method works well if done correctly but understand what is really happening is that the roof will "float" on top of the existing roof. The roofer will tell you this is a 10 year roof or some such. I would consider this temporary at best - you might get 5 years without issues - but if the membrane is ever penetrated you will get wet. Also, because you are not removing the existing roof, any existing wet spots can stay saturated against the original asphalt (I added below what happened to me using this method so read on).

3. Asphalt Built-up - this is the original technique used by the builders of these homes - however it requires the removal of the original roof which can add quite a bit to the expense. Since you are pulling everything off, this is the time to replace any rotted or twisted boards. This is also a good time to locate any additional lighting and shore up any rotted beams, etc. The original flashing will be removed along with everything else. If you don't mind the look, raise the roof slightly by going to 1.5-2" of ISO board - it will add an R-value of 10-14 and improve your utility bills. You will also need to add a wood nailer around the perimeter to raise the flashing to the height of the ISO board. I've described the methods used above and this is still the most common method used on commercial buildings. This type of roof can last 20-25 years or more (manufacturer usually states 10-15, but the reality is that this last a long time).

4. Asphalt built-up with a Modified cap - this is the method that I actually chose (the most expensive method but worth it if you plan to living in your house forever). This method is similar to the Asphalt built-up above, only a hot mop-down modified membrane roof is attached to the top of the asphalt layers. This can be doubled up to extend the roof even longer.

The initial Torch-down modified roof I had put down was improperly installed. The roofer (who was supposed to be qualified with experience in this type of installation and was also highly recommended) gave me a very reasonable bid of $5k do do the roof (the roof is approximately 40 squares or 4000 square feet - I should have figured it was a scam and too good to be true) to place a membrane roof over the existing asphalt "built-up" roof. As the other bids I received were over $10k for the roof, we went for the cheap, thinking that we would get 5 or so years out of the roof - the plan was to eventually get a better roof through a complete tear-off and rebuild. We actually got about 6 months before things started to go wrong.

First, the roofer used a shovel to scrape off as much gravel as possible - this turned out to be stupid as everywhere a stone was pulled from the existing asphalt, a gap appeared in the existing roof as a potential leak. Second, the roofer did not cut off or replace the existing flashing. Third, because the substrate was not reinforced with some type of nailer, the new roof was not truly melted onto the old - the roof basically was sitting as a flat sheet on top of a sieve. Because the flashing was not replaced, the edges were not sealed - this made this worse as the roof "crawled" across its expanse, water crept under the edges and found the missing rock holes to penetrate - the result was massive leaks, with water coming down almost every wall. Every attempt to get the roofer back to fix the issue was ignored - ultimately we had to litigate (we won, but have as yet received no money on the judgement, nor do we anticipate we will).

When reality hit we knew we needed to do something quickly. Not wanting to get bitten twice, we heavily researched roofing methods and applications. That was when I discovered that 90% of the roofs for our type of house in the area are incorrectly installed - meaning that even if we had a claim against the manufacturer of the roof with a 10 warranty, etc., the claim would have been invalid as the guarantee is only good if the roof was properly applied. We ended up getting 12 estimates, ranging from $7500 to $40k (ouch!). We decided to go with a real commercial roofer who did a phenomenal job. The original estimate was for $14k, however we went with 1.5 inches of ISO board and replaced several hundred feet of rot, including the ends of two beams. This brought the price up to about $17K plus an extra thousand for additional wood materials.

I think the greatest lesson learned is to research the roof options, then really question the roofers to make sure they know what they are doing. Our final roofer actually had the GAF rep come out and do a core sample so that the warranty was registered with them. The cores they cut exceeded the manufacturer's specifications. I'm happy to report that three years have gone by on the new roof without any issues.

John Eaton

(Originally published 2005.01.10 in the thread: "Flat Roofs Don't Like Rain" on the Lotta Living forums)

Friday, July 27, 2007

Modern Landscape Design

I attended a really wonderful DOCOMOMO lecture last night in regards to Modern landscape design. James R. Cothran lectured and featured images from a recent tour of Thomas Church designed gardens in the San Francisco area and locally, plus a pretty much intact garden in Columbus Georgia designed by James Rose - the current owner's of the latter property were also in attendance, as well as some faculty that worked with both architects during installations at UGA. Although I had an above-normal awarness of modern landscape architecture, the lecture really brought things into focus for me and provided some great ideas - also the reference materials got me searching for some books (two that I bought online today were "Invisible Gardens" on Amazon and "Modern Garden Design" by Janet Waymark) - both featured works of Church and the former James Rose.

If you're into Modernism and live in Atlanta, I highly recommend the DOCOMOMO sponsered events and lectures. Blog is here: http://www.docomomoga.org/wordpress/

-- John