Showing posts with label Electrical. Show all posts

Friday, January 1, 2010

Installing Whole House Surge Suppression

I recently installed a whole house surge suppressor in my electrical panel and thought I would relate the experience. In all it wasn't a difficult install, however it involved some planning, especially to determine how I would make room in an already crowded panel. As with anything that is involved with electricity this is one install where I'd recommend a certified electrician if you're not confident of doing the work yourself.

Why Surge Suppression?
Surge suppressors, also called surge protectors, stop voltage spikes from harming your electronic appliances in the home. One type connects to the main electric panel off a circuit breaker or directly between the meter and panel, while the more common type are point-of-use surge protectors for electronics such as computers, telephones, printers, etc. You often see the latter integrated into office-style strip outlets or better yet, back up battery devices (like those made by APC). We have several of these that our computer systems and TV/Stereo systems plug into - a few years ago a broken electrical pole next to the house sent a spike through the cable system frying the cables and knocking out the suppressor on the TV - since we were out of town when it happened all the computers, modems, etc were off so they weren't affected. The suppressor on the TV/Stereo protected all those components as the cable fed into it, saving us a bit of money in replacement costs (or at least the deductible on an insurance claim). Not to mention the threat of a fire - having suppressors just makes good sense.

Electrical disruptions in power are real and they are becoming more of a threat to electronic equipment regardless of whether or not you live in a new home and constant fluctuations happen all the time in my neighborhood. A voltage surge or spike caused by a blown transformer (which happened just a few days ago on my street), downed power lines (ditto last year), lightning, electric power grid switching, etc. are all examples of what can happen to affect your home's systems and appliances. Additionally, over 50 percent of the power surges your electronic equipment will experience are created within your own home when appliances with large motors (air conditioners, refrigerators, washing machines, compressors, etc.) turn on and off. What's more, most electronic devices manufactured today contains micro-processing chips that are sensitive to voltage spikes - even your light bulbs are affected. If your light bulbs seem to wear out quickly then you're probably already experiencing fluctuations that the whole house suppressor can help smooth-out. You need surge protection and lots of it if you want to protect everything connected to your house grid.

The focus of this post is a whole house surge suppressor (I'm hoping most of you already have the type that connects between your more expensive equipment and the outlet). These devices are designed to stop harmful surges and spikes before they can travel towards the electronic equipment in your home. They are not DIY friendly so my recommendation is for a professional, licensed electrician to install a whole house suppressor. A good electrician can complete the task in less than one half hour in most cases and the suppressors are affordable as there are several in the $200 range (figure in about an hour of an electrician's time and you'll see it's not out-of-reach). When calling around you may want to note what type of panel you have (it's usually marked on the panel or you may be able to find a manufacturer on a breaker) as it could reduce the costs of the unit - there are some that install directly in the panel where the first couple of breakers sit in the box.

My Electrical Panel
In my case our home has a 150 amp Cutler Hammer panel with corresponding breakers. I mention that as it's unusual in Northcrest to have 150 AMPS and an original panel from 1964 (when the house was built) - most homes on my street built around the same time have 80 amp fuse boxes or have at some point been upgraded to a 100 amp panel. Apparently the original homeowner of my house sprung for the additional costs - this is both a boon (as the larger panel makes changing things more flexible) and a curse (Cutler Hammer breakers are a great deal more expensive than other manufacturers for some reason, so it can be difficult locating what is needed, especially at a reasonable price). I went through all this last year when I started building out a workshop in the basement - first adding a 100 amp sub-panel dedicated to the equipment, and then finding tandem breakers (those are breakers that make two switches available in the same slot as one - allowing me to move circuits down to make room for the larger, two-pole breakers necessary to power the sub-panel). Once again I needed to move things around to make room for the 30 amp two-pole breaker needed to power the surge suppressor. While in the panel I freed up the first two slots for the breaker required for the suppressor, which hangs off the side of the panel. Finding two tandem breakers wasn't difficult - but at $25 each rather expensive. I found a seller on eBay that had four new tandem breakers for $25 shipped - much more reasonable (as a comparison a single comparable SquareD tandem breaker is $7 at Home Depot).

Choosing a Surge Suppression Unit
There are a variety of units available but in general there are a few things you need to look for:
  1. Joule ratings of 1,900 or greater - Suppressors work the way they do through the use of sacrificial metal oxide varistors (MOVs). Small surges that enter your home over time slowly destroy the MOVs. A large surge can cause instantaneous destruction of all of the MOVs in an instant (you want the MOVs to take the load instead of your appliances and components). The MOVs ability to block surges is measured in joules (how electricity is measured, also called a Newton-Meter). Purchase a surge suppressor that has a high joule rating - 1,900 or more if possible.
  2. Clamping voltage is the next thing to consider - This rating tells you when the surge suppressor will react to a surge. High quality suppressors have low clamping voltages - the suppressor should have a clamping voltage of 330 volts or less. The package will have a Underwriters Laboratory (UL) UL-1449 voltage rating - this is the true measure of clamping voltage.
  3. Warning Lights - Because surge suppressors wear out (due to the MOVs being constantly worked), look for a unit that has lights and/or audible alarms that tell you when the MOVs have worn out. Both the whole house and point-of-use surge suppressors are available with this feature.
  4. Replacement Warranties - Look for suppressors that come with connected equipment and total replacement warranties. Numerous manufacturers will send you a free replacement suppressor when and if yours fails - so the initial cost of the unit pays for itself the first time it fails (provided it happens during the warranty period - most warranty for 5 years or so) - some will pay up to $100 towards the electrician's repair bill when your whole house suppressor needs to be replaced. The better units I researched will also cover repairs of appliances and/or devices if the unit fails to stop the surge.
The unit I selected is made by Panamax - the SEP-200. If you'll look at the stats you'll see it complies with the 4 items above - I also have a bit of brand loyalty to Panamax as it was a Panamax suppressor that saved my TV and stereo equipment when power was forced into my cable lines (see above). If you're into HiFi you'll probably already know about Panamax as they've been a top-tier provider for surge suppression - one of the only providers that guarantees against lightning strikes - they also provide up to $10,000 in appliance replacement costs if the unit fails. This unit can be installed inside our outside of the home, attached to the panel (using a 30 amp two-pole breaker) or between the meter and the panel (not an install I'd recommend to a DIYer unless you're a qualified electrician). I chose to wire it into a breaker - something within my level of confidence to do. Since these units eventually wear out, I wanted something that would be easy to replace when the time comes - another consideration

The Install
I tackled the install in three phases (being the anal-retentive that I am, I actually wrote up a short project plan).
  1. Examine the panel and make a plan, including picking up all components and parts
  2. Rework the panel to have room and prepare all components
  3. Install the unit and test.
The first part was one of the more crucial - I took off the panel cover and sub-cover (my panel has an extra cover that protects the breakers) and examined what I had to do to free up the first two slots. This is where I determined I could combine four 15 amp single slot breakers into two 15 amp tandem breakers. I then sourced the breakers from an eBay seller - who incidentally also sold me the 30 amp breaker necessary for the install of the surge suppressing unit - buy buying it all together I additionally saved on tax (not to mention the tandem breakers were half what I would have paid for a single at Home Depot). Turn around time was less than a week. I did all this stuff before tackling Allen's Tankless Water Heater install (see previous posts).

The second part I tackled one evening while there wasn't anything going on that would require power - I like to disable the entire panel by turning off the main switch while in the box. I'm still very careful as there's still power coming into the panel - but this way I'm not inadvertently taking any risks. I moved circuits around and combined into the tandems to leave the first two slots free. This took about 30 minutes or so of careful striping, wiring and the screwing of clamps (in the breakers)

The third part required that I remove a "knockout" from the side of the panel (the panel has cuts in the sides so you can knock out holes for wires to feed through) - I also removed an unused wire that formerly occupied the same space (went to the steam shower heater which I'm removing). I attached the unit directly to the pane using a spin-clamp - the wires were fed in and tied to the 30 amp breaker and ground/neutral bus (in my panel they are the same - in newer panel they may be separate bars). There's plenty of force in the clamp to hold the unit to the side of the panel - in your install you may want to screw the unit to the wall or extend the box slightly using some conduit. I then tested the unit by turning on the power - everything lighted up just fine. I replaced the two panel covers and was done. Total time about another 30 minutes or so.

A couple of days after the install I was at Allen and Susan's house - it had been raining most of the day and there were several people over for Christmas dinner. Suddenly there was an explosion that caused us all to rush to the front window. Subsequent explosions literally lit up the sky - the transformer right in front of his house (he's about 3 doors down from my house) had been hit by a falling limb - luckily the wet ground prevented any of the flaming embers from igniting anything. It took several hours for Georgia Power to restore power to this portion of the neighborhood. All I could think about was how fortunate I was that the Surge Suppressor was already installed at the house - it provided a level of piece-of-mind that I wouldn't otherwise have felt. Returning home later I found everything to be fine - the unit worked flawlessly.

-- John

Saturday, December 26, 2009

Installing a Tankless Water Heater Part 2


Day two basically began with the previous 19 point list. However as we got into the panel there were a few things that "added on" to the list of tasks. The initial reason we did some mods to the electrical was to ensure there was plenty of juice going to the outlet that both the washer and water heater would share. Looking at the amp loads there should be plenty on the existing 15 amp circuit - however I discovered that the outlet was wired with 12-2 Romex which would allow a 20 amp breaker without much modification so I suggested that change to Allen - it would also allow us to more easily move the outlet to a more convenient spot. A "radiused" piece of conduit was the ticket, and to make things more flexible we inserted a tandem breaker (allows for two 20 amp circuits) into an empty slot - the extra is for the future expansion of an extra circuit and the cost difference between a single and tandem is negligible. The box used for the outlet was also expanded to a two-gang (allows for four outlets) and the outlets were also upgraded to 20 amp - that way if Allen or Susan needed an outlet in that area they wouldn't be taxing the existing circuit - say for a shop vac or power tool.

While in the box I also suggested to Allen that moving the dryer 2-pole receptacle up a bit would make it easier to reach, so that was also done. Everything electrical was done to current codes - meaning the appropriate wire, clamps, etc. were all used so the house would pass inspection if ever sold in the future. If you're not sure about codes or not experienced working in an electrical panel I strongly recommend that you leave this stuff to a professional electrician - it's just not a good place to do something wrong as there's a possibility of electrocution or fire.


Once the electrical was tidied up the next task was to locate where to knock out a hole for the exhaust vent. The exhaust vent was hand-fit to the top of the unit so we could make sure that there would be clearance. You can see the initial location drawn by Allen on the block wall (image in Part 1)- I suggested that it be moved over one vertical course to ensure it wasn't in-line with the bath vent (I wasn't sure if it would really be an issue but I didn't want any obstructions, especially when attaching the outside flashing) - that exposed a conflict with the current placement of the water supplies (both the existing copper lines and legacy galvanized steel supplies) for the washer/dryer hook-ups - those would have to be moved. This was done - we also added a "laundry box" kit so the valves would be easy to identify and have a stationary mount. The new Pex pipe was tied into the existing copper using a Sharkbite fitting (more on those later - see image below).


We started out by drawing a 6" circle in one-half of the block, drilling 6 equally spaced holes along the circumference with a hammer drill, then carefully chiseling using a one-handed sledge. This was repeated on the outside until an opening was large enough for the exhaust vent to fit properly - note that the horizontal run has to dip slightly according to the manufacturer's install instructions - also the entire unit couldn't be assembled then attached - it had to be inserted then assembled piecemeal to clear overhead joists and pipes.


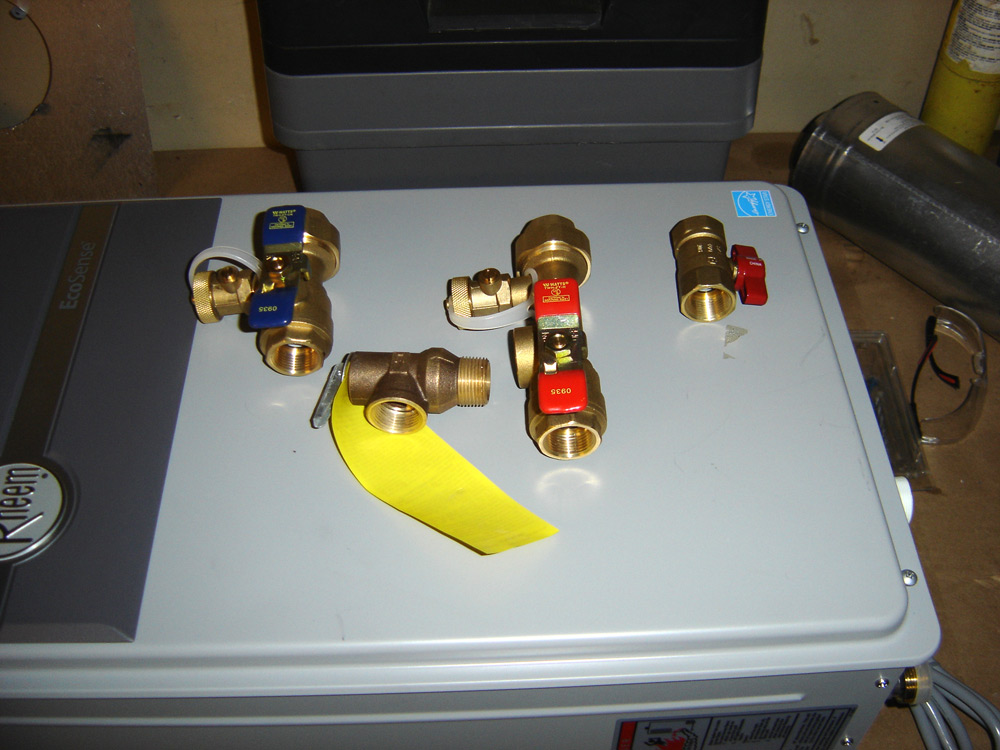
The valve kit was carefully threaded onto the bottom of the unit (follow the directions as the pressure relief valve is attached to the hot water valve before placement on the unit). Next the unit was hung and sited along the level. There are brackets to the top and bottom that hold the unit to the wall, with the majority of the weight transferring to the wall itself. The venting was attached piecemeal until secured with the supplied screws and some towels were stuffed into the remaining opening in the block to keep out bugs or curious animals (mostly a piece-of-mind thing). Now that the unit was in place some of the serious work can take place. The idea with all plumbing is to be as efficient as possible when assembling pipe, trying to keep down waste from miss-cut pipe and also providing enough clearance so none of the piping is snagged when walking through the space. I had already mapped out a couple of paths for the water lines - we decided to re-use the existing water heater attachment points so it was a matter of piping over the space as tight to the ceiling as possible while using as few fittings as can be accomplished.

Now a few thoughts on Pex pipe - it's certainly more expensive that PVC, however it's less expensive than Copper. The real benefit comes in its flexibility and ease of installation. Pex uses a black coated, copper crimp ring, tightened to fittings to form a joint. You cut the pipe to length using plumbing cutters (these are the same as what you typically use when plumbing PVC or CPVC). You next slide a crimp over the end before pushing the "nipple" of the fitting into the tube. The ring is then slipped over the fitting "nipple" and a crimping tool is applied to the ring, which applies even pressure inward. If the crimp is successful the joint won't leak when water is pressured back into the system. Crimping can be a bit tricky - if the ring isn't on straight or if the action of the crimping tool is precise, the ring can be twisted a bit on the fitting. It's my experience that usually these poorly crimped fittings won't leak, however you do increase the chance of leaks as there's less surface area for the ring to apply consistent pressure on the "nipple" of the fitting - you're basically taking a chance with these when improperly crimped. The solution is to cut off a little of the end of the hose, grab a new fitting and try again. You can carefully remove the bad crimp by cutting and re-crimp, however once the Pex tube has been compressed it becomes suspect, so you may as well cut off and start with fresh.

Some of the other advantages of Pex - once a 90 degree joint is made the pipe can still be twisted without causing a leak - something you can't do with CPVC without adding additional fittings and pipe (or cutting and re-placing the rotation angle with a slip coupling). Another advantage has to do with the flexibility of the pipe itself - it can be carefully bent to go around obstacles and the material won't split if the water in the lines freezes - making it an appropriate replacement pipe for a supply line out to your meter. If you've ever dealt with copper piping you know there's preparation involved in sweating the joint with solder - and if you aren't successful in making the joint it becomes problematic after water has been added to the line. With CPVC you have to deal with primers and glues that can get a bit messy (don't spill the primer on a good linoleum floor - ask me sometimes how I know). With Pex it's all about the line, the crimps and the fittings. There's some additional cost involved with the crimping tool - I bought one that has both the 1/2" and 2/4" in the same tool - it was purchased while I was working on my own plumbing so I was grateful for the opportunity to use it again - I think it cost about $65 or so.

All the Pex was run back from the unit back to the location of the supply line (cold water) and system tie-in for the hot. By reusing the existing we didn't have to worry about blocking off the old hot water and making a connection elsewhere - however you may want to rethink that based on your own circumstances. If you can tie-in closer to the unit you will probably have a faster delivery time for the hot water, depending on the placement of the spigot. All the water lines were run and any additional parts, bits or pieces were noted. Next careful measurements were made to run the gas line to the unit. This is where it can get tricky - since the gas line has to be 3/4" all the way to the unit you need to find that size pipe to tie-into - also you can't use the flexible connecting pipe as it reduces the line size to 5/8" or smaller (there is commercial flex line available but it's a bit expensive). Since it all runs through galvanized pipe the measurements need to be very precise. Also you'll need a slip-coupling or two to make sure you have room to place the final couple of pieces - the slip-coupling uses a compressed o-ring so you can turn either end of a pipe with a wrench, providing some flexibility in install. We saved the gas-pipe install and actually connection to the house for the third day after making a list of all the fittings we thought we'd need - we also added plenty of extra to prevent an extra trip or two.

On the third day we purchased everything we'd need to complete the job at Home Depot - we also made sure to buy extra nipples (in plumbing the short pieces of pipe that are threaded on either end are called nipples - don't ask me why) in various sizes in case we needed them. One tip - if you buy this stuff at Home Depot - use the same credit card for all purchases on the project - when you're done you can take back anything unused without a receipt - the do a reverse look up based on the credit card number - it makes it much faster and convenient and you don't have to hunt down receipts (I believe they keep these records for several months which is real handy when your projects get extended for whatever reason).

Preparing to tie-in the gas line the supply was turned off outside of the house after turning off all gas appliances like the furnace and old water heater. This time we started piping from the house and worked backward to the unit. A cut off was added near the beginning so that if something caused a delay in the install the new pipe could be isolated from the old and the old water heater be used. Everything was done with this is mind so that Allen and Susan wouldn't be inconvenienced with the lack of hot water. The pipes were carefully threaded together using pipe-threading compound - basically a Teflon paste that seals everything up once dried. The pipes went up-over just like the water lines and then down the wall, across and up to the gas supply valve on the unit. This actually went together very well. Once together the system was tested for leaks. There are a couple of methods to doing so - With all the supplies to other appliances cut off using supply valves, you can look at the gas meter to see if there's any movement. If none it's a fairly good indication that the system is air-tight. We went further and added a few drops of soapy water to each joint to see if any bubbles appeared - we got lucky - no leaks on the first try! Perhaps a better way to check is to pressurize the line with 30-40 pounds of air using a compressor - any leaks are very noticeable.

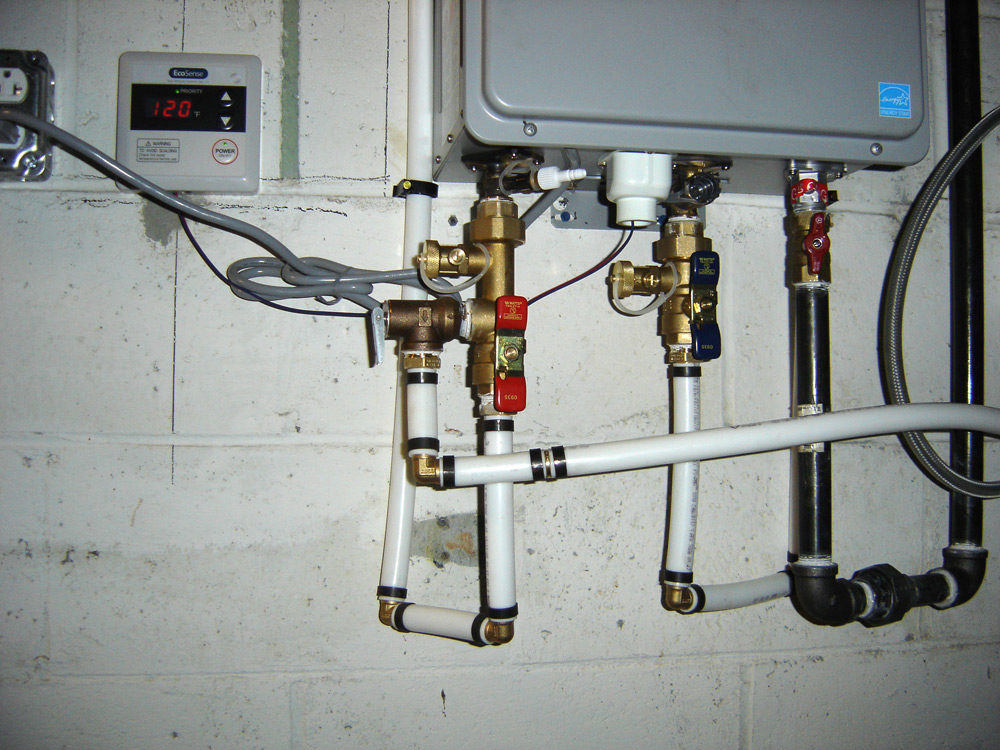
There was one additional task before hooking up the water - the control pad was mounted to the wall and tied-in (there's an image above that shows the control pad mounted). I found it interesting that extra pads could be added and placed about the house providing some heating customization depending on the task - basically if you want the water to be hotter for the dishwasher, for instance, you can add a control to the kitchen so that the water temperature can be adjusted just before use. That's something you can't do with a tanked water heater.

Finally the Pex was tied into the house lines using Sharkbite fittings. I mentioned these before - Sharkbites are a product that allows for the connection of dissimilar piping. I discovered these while working on my own home - I had Pex coming from one direction where it needed to attach to 1/2" CPVC at a right angle and Copper going straight out. The Sharkbite allows for the end of each pipe to come together as one connection. In Allen's home the majority of the piping is copper - using the Sharkbites allowed the Pex to tie-in directly to the copper. If you've ever had to do this in the past it usually takes several screw-fittings and a sweat joint (if copper) so the Sharkbite cuts down on install time and works great.

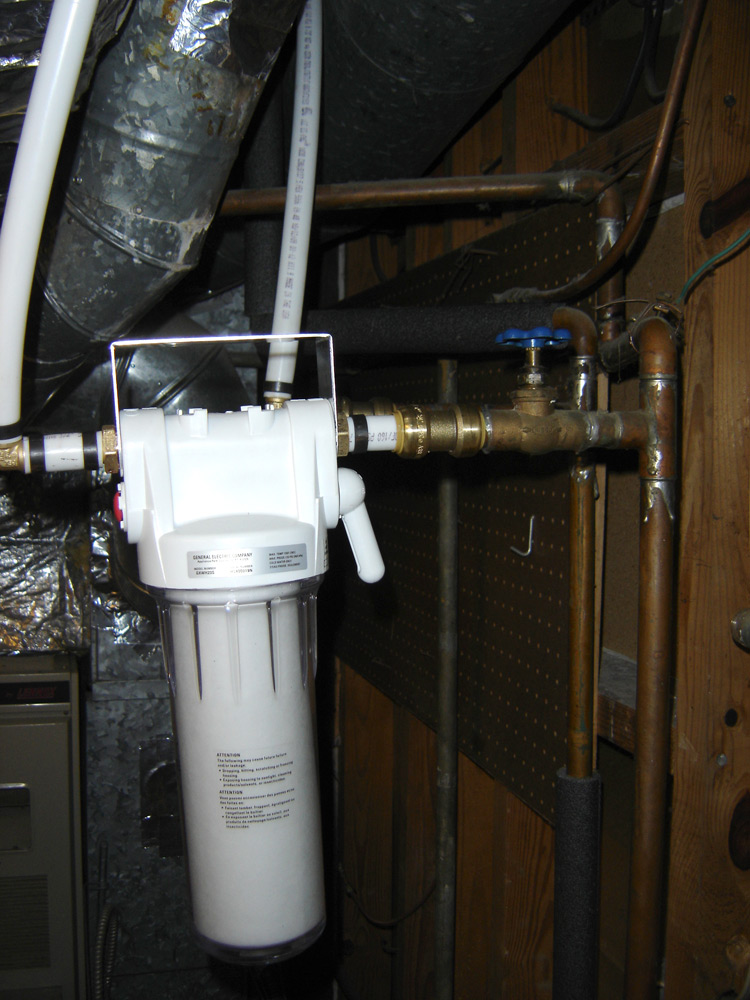
The last task was to fit up the water filter that was recommended to Allen - apparently if you filter out as much as you can before water enters the unit you save having to descale the unit (water in Atlanta has quite a high level of mineral content) - this serves to extend the life of several parts. The filter was added between the cold water supply, extending outward as there will be a wall added to section off the home's systems from the rest of the basement. Finally, we turned on the water and checked for leaks - surprisingly there weren't any (rare when doing any plumbing) - the gas was turned on at the unit and the power was set to "on" - the final test was to go to a sink and turn on the hot water. I think the most amazing thing was in how quiet the unit is - you can only hear it when standing right next to it.


Here's an image of the final install - note that the drain line for the pressure relief valve was moved to the front - it was a bit too stiff to be workable in the back and still make it into the washer drain. Allen set the temperature to 120 degrees (see the read out) which seemed to be optimal for their household. In all, the installation wasn't too bad - I can totally see why the installers charge so much though - lot's to think about here and many systems that need to be "touched." If you aren't a very handy person I'd leave the install to the pros - of if you feel confident on parts of the install you could do what you know and bring in someone to do those bits that are uncomfortable to you. On a scale of 1-10 I'd call this about an 8. . I'll update again once the unit has been in a while to reveal how it's working out for Allen and Susan.


-- John

Thursday, December 17, 2009

Installing a Tankless Water Heater Part 1

I've been researching the Tankless Water Heater for a bit over a year as I have an old tanked unit - the current energy tax credit makes it very desirable - however being the conservative that I am, I'm waiting for the old unit to kick-the-bucket as it were. My current hot water heater is over ten years old so it should be getting close, right? In any case, I've been looking at this stuff for a while in preparation for my own install. It's interesting when you research products on the web - the first thing you find are all the things that people don't like about something. You also learn what people have done that incurred the wrath of the pros - mostly improper installs. I'll get into that later as it's all good information and stuff you'll want to know if you consider doing this yourself. All this came to a head when my neighbor Allen across the street told me that his old tank was leaking and that he was about to put one in - he was asking me questions about the install. I told him I hadn't done a tankless install yet (I have done the old-fashioned tank though) and was willing to help him put his in, as I'd like to get some practice in before tackling my own.

About my own experiences - I was a general contractor many years ago (over 10 years) before getting into software design. As such I worked with several other contractors that allowed me to practice plumbing, electrical, HVAC, building and other disciples that helped to increase my confidence level in tackling various building and/or remodeling tasks. Luckily the contractors I worked with were very good and up to and enforced the various building codes - they also instilled in me a desire to do good, neat work that both complied with codes and also incorporated the latest in best practices. Doing an install of this nature incorporates many disciplines so if you want to try part or all of this, I suggest you bone up on: electrical installation, plumbing installation and gas (in this case Natural Gas) piping installation. After reading this if you feel unconfortable with any part, HIRE A PROFESSIONAL! I can't stress this more - if you wish to proceed, read everything in the install manuals several times before and during the work. Also, if at any time you're not sure, stop and do some additional research. This isn't something for the weekender to attempt. More on this as we proceed.

First on the Tankless Water Heater:
The technology has been around for many decades - so there's been plenty of time to perfect the technology. One of the oldest producers that's availabe in the US is Bosch (most have heard of them as a tool manufacturer but they've been making and selling their tankless water heater in the US for many years). Most of Europe and a good bit of Asia have had tankless systems for a very long time - the US is way behind, mostly because cheap energy has been available here for so many years that the cheaper "big tank" units are simply easier to install and incur the least materials cost. This has all been changing with energy fuel costs all over the place.

There are basically a few considerations - first is the unit to be inside or outside? Second, what is the type of fuel or energy you're going to use to power it? In the Atlanta most will place the unit inside and in the Northcrest community, most will have the unit in the basement where all the house systems tend to congregate (most Northcrest homes have a single room in the basement that's home to the electrical panel, furnace, water heater and often the washer and dryer hook-ups). Natural Gas is plentiful and cheap in this region, it's also probably the most efficient and cost effective to use, so the focus will be on that install. The other options are LP/Propane and Electric. Solar doesn't generate enough amperage (I don't believe) so it's not an option (however if you're in Florida or one of the states that gets more than its share of sunlight, you might want to consider a solar water heater - but that's an entirely different animal). Outside tankless units are usually used on cabins or otherwise in installations where space is a premium.


Available Tankless Water Heater Options:
I read quite a bit about the various options, who to purchase from and where to source. There are a lot of opinions, and I'm sure the list will change by the time I eventually buy one for my own home. I had pretty much selected either the Bosch or Rheem units. Another manufacturer that is highly recommended is Rennai - however you have to be a certified Rennai installer to purchase one. In this case Allen purchased a Rheem unit at the Home Depot (Rheem EcoSense On Demand 6.6 GPM Natural Gas Indoor Direct Vent Tankless Water Heater Model # ECO-180DVN). With this kit he also purchased the venting kit (3 In. x 5 In. Concentric Direct Vent Kit for Rheem EcoSense Tankless Direct Vent Units Model # RTG20147-1) and the valve kit (Tankless Water Heater Installation Valves Model # TWH-FT-HCN).


What you need and a comparison of costs:
AT 6.6 GPM the unit is sufficient for most homes in the 3 bedroom, 2 bath range. You may want to consider something larger (7.4 GPM) if you often have two people bathing at the same time the dishwasher or washer is running - for both Allen and my own home,  this is not the case. The vent kit is necessary as you cannot use the existing B-vent. It's simply not rated for the bursts of heated air that the tankless produces - also the new kit is stainless steel and vents directly through the wall to the outside - you'll need to use the right kit for the manufacturer's warranties to apply. Finally the valve kit just makes the install a bit easier - it's not necessary but it does make things more efficient by providing the parts/pieces that you'll need for the required configuration. The extras add about $300 to the price of the heater. Along with all this we ended up buying about $300 worth of pipe fittings (water and gas), valves, electrical supplies and a water filter (more on that later). The unit was about $1k so a total of about $1600 in parts. Most installs of this type are going to cost in excess of $3000 with labor so you end up saving about half. To compare to a tanked unit - you can re-use most of the existing bits that currently hook up your tanked water heater, so  there's very little material cost with the exception of the tank. A 60 gallon GE unit is $678 (anything smaller makes it hard to fill the tub - if you have a jacuzzi you may need something even bigger). With the tax credit of about 30% on the tankless you'll get back about $480 (not sure if you can get a credit on all the bits/parts so this may vary). So it's about $700 for the tanked unit compared to about $1100 on the tankless, give or take. The $400 difference will probably be offset by the energy savings within 5 years or so (probably less, I'm being conservative but it depends on your hot water usage - if you have a family it will be more).


The Gotchas:
While doing research there are some very good posts on what went wrong - there's also a huge share of posts basically slamming the various units for one reason or another. For one, it can take 20-30 seconds longer for hot water to flow, depending on how far from the unit the tap is. There are also several posts by professional installers providing insight into the various units. The Bosch unit, for instance, is highly recommended, however it has a wear part that's about $300 compared to the comparable part for the Rheem that's about $80. Something to consider. Also, most who complain and have had to have a pro come in and fix and installation did one of the following:
  1. Improper plumbing installation. This usually involves the size of the pipe coming into the unit. A 3/4" supply line is requried - this doesn't mean you can connect to a 1/2" line with a larger 3/4" line and everything will be fine. This is all about capacity -when it's time for the water to be heated enough has to enter the unit to fulfill the units requirement - if there's a pressure drop the unit will red-flag and not produce enough hot water - it can cause the unit to be less efficient and certainly may reduce the life of the unit. There are many safety features in the tankless units to account for fluctuations so it may not shut down, however it could produce a condition that isn't conducive to producing the desired amount of hot water when needed.
  2. Improper gas installation. This unit requires a 3/4" line coming in with natural gas. As with the water line above, if the available gas line capacity is not great enough to power the unit, at minimum you wont get the hot water desired, and at worst it may cause the unit to fail. As I've stated previously, make sure you read the entire install manual and prepare to make any changes necessary for the unit install - if your pipes keep reducing until they come to where you need to place the unit, you'll need to tie-in earlier (closer to where the pipes come into the home) where larger piping is available. Another issue comes from re-using the flexible gas supply line commonly used on furnaces, appliances and water heater tanks - this line may have a 3/4" fitting on either end, but is usually 5/8" in actual tube diameter which may cause issues (most home flex is rated at about 110 BTUs - the tankless unit requires 160 BTUs or more so they aren't rated for this application). The best solution is to tie your piping directly to the bottom of the unit.
  3. Improper venting. These units produce short bursts of heat that far exceed the rating of the current B-vent that goes through your roof (what your old hot water heater and furnace tie-into). When you tie into the existing it produces a lot of heat and back-pressure at the unit, usually resulting in a shut down - the result is you don't get enough hot water. It can also kill the longevity of your unit as a worst case scenario and will void your warranty. Along those same lines, you must use venting that's rated for this application (stainless steel) and follow all the manufacturer's directions as to proper install.
  4. Electrical: These units have to be powered, so there needs to be an outlet available - at about 2 amps the needs aren't high, but don't tie the unit into a heavily used circuit where there are many peaks in amperage or this could affect the units ability to work effectively.


Starting the Project
So the first think we looked at was where Allen wanted to place the unit. A place on an outside wall opposite the furnace was proposed. As the washer and dryer are beneath we needed to make sure there was space with the vent kit above, and the valves and connections below. This required that the vent kit be loosely placed on the unit and the valve set below. When doing this, make sure that there aren't any obstructions on the outside (for instance there's a vent cover for the bathroom exhaust fan that made one location undesirable - it's better to not have the exhaust for the unit in direct line with anything above; on the other side of the panel the electrical meter is mounted on the outside wall, precluding that area from being available for the install). Another consideration is future planning - Allen wants to wall up the room holding the furnace, washer/dryer and tankless unit, so we tried to maximize space usage. This would require the removal of some legacy steel plumbing pipes (no longer in use) and the move of the washer/dryer supply lines. Note the image above - this was the initial placement - after reviewing that there's a vent above that location it was moved over to the right (which necessitated the move of the supply lines for the washer).

Another consideration on the placement was the availability of a circuit - currently there's a 15 amp single outlet for the washer - we decided to upgrade to 20 amps (there was already 12 gauge romex) and place a two gang box on the end of some shielded piping. While at it I suggested that the outlet for the dryer be moved up to make it more convenient. Next I took a look at where the best places for hooking up the water and gas would be and started loosely maping out the best routs to the new tankless unit. I drew up on a large piece of paper all the drops, changes of direction and connections needed - we choose to use Pex piping which I've recently done a bit of work with - since I felt really comfortable with it and also owned the crimping tools, we based all the fittings for water on Pex. After laying everything out we worked on an initial project plan. Whenever there are lots of dependencies it's good to make a list of the order for getting things done. It went something like this:
  1. Shut off power at panel
  2. Move electrical circuits, upgrade to 2 gang box, feed into new 20 amp breaker
  3. Power on panel and check new electrical fixtures for good grounds, etc.
  4. Locate hole for venting kit, break through and secure venting piping
  5. Prepare tankless unit for install
    1. Mount inlet valve set
    2. Mount outlet valve set
    3. Mount gas shut-off (supplied)
  6. Mount unit to wall
  7. Pipe water inlet backwards to a source pipe (we chose to pipe back to the supply lines for the original Water Heater - this would provide a convenient location for the in-filter).
  8. Pipe water outlet backwards to ti-in pipe (once again it was easier to tie-in back at the original Water Heater outlet point since we would have had to address the open line there anyway.
  9. Turn off gas
  10. Add a "T" style connection to the gas system, along with gate valves back to the unit.
  11. Turn on gas
  12. Check all Gas lines for leaks and correct if necessary
  13. Turn off water
  14. Do final connection to inlet filter and water supply
  15. Do final connection to outlet to supply home hot water lines.
  16. Turn on water and check for leaks
  17. Mount electrical control unit and plug in unit
  18. Turn on tankless unit
  19. Test
We made some modifications as we went along, however the above is what we came up with the first day. We both went on to further read and study the installation manual and met up the next day. At this point there was more than a small leak to his original tank so it was imperative that we get the job done. However we still didn't rush. The next day was set aside for the majority of the install. The goal was to get the unit hung and the water mostly plumbed. Day three would be for system tests and final hook-ups. More on the next post.

Continued in Part 2

-- John